Using the Model Libraries Sidebar
Browse through your Default Model Library to view three-dimensional images of your library items. Rotate and enlarge an item to visualize how it will look in your various scenes, and even share the 3D image with others.
- Click or tap the Model Libraries sidebar option
 on the left-hand side of your screen.
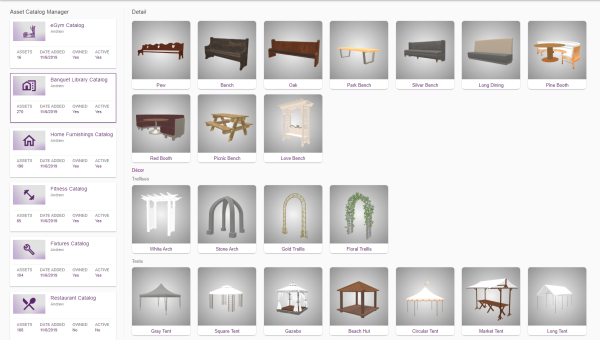
Result: The Model Libraries screen opens, with your available model catalogs in the Asset Catalog Manager pane on the left and the corresponding model details in the Detail area on the right.
- Click/tap the desired catalog, if it is not already selected.
Result: The items for the selected catalog display in the Detail pane.
- Click/tap an image in the Detail pane to view specific details of the image.
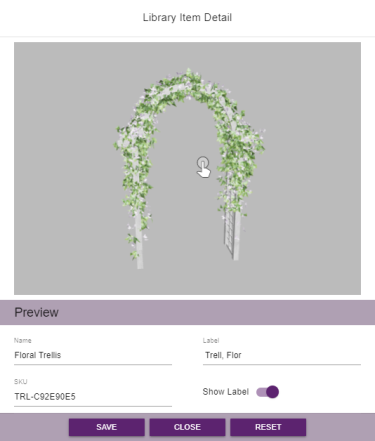
Result: The Library Item Detail window opens.
Note: The Preview area at the bottom of the window indicates item details such as Name, SKU (product identifier), and any label settings. (See Step 4, below.)
- Optionally type an alternative item label into the Label field.
Note: The label that displays in your various layouts will reflect whatever name is populated within the Label field. The Show Label toggle must be in the "on" position for item labels to display in your designs. - Click/tap the image, and use the 3D "hand" tool to view all perspectives of the selected object. With this tool, you can manipulate the object by using the motion indicators to rotate the object. Use your mouse wheel to zoom in and out and pan across the object. If using a tablet, just place your index and thumb about a half an inch apart on the screen and slide them apart to zoom in; slide your fingers back together to zoom out.
- Click/tap Save to save your label settings and close the Library Item Detail window; click/tap Close to close the window without saving your changes; click/tap Reset to restore the label to its previous state.
See Also: