Managing Placez Picklist Items
Several fields in Placez offer picklists, which are drop-down lists of choices you can select from preset lists. Refer to the topics below for step-by-step instructions on adding and editing your own custom picklists.
- Click or tap the Settings sidebar option
 .
.
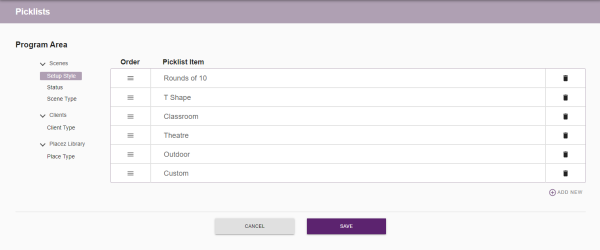
Result: The Picklist Program Area screen opens.
Note: To change the icon-based navigation to a word-based navigation, click/tap the List button (three horizontal lines) at the bottom of the sidebar panel on the left-hand side of your screen. - Click/tap Scenes >Setup Style, Status, or Scene Type.
- Click/tap the Edit button
 , located on the upper right-hand side of your screen.
 - Click/tap the Add New button, located on the right-hand side of your screen, just below the trashcan icon.
Result: A field is added to the bottom of the list, titled "New." - Type the name of the picklist item into the "new" Picklist Item field.
- [Optional] Reorder your picklist items by clicking/tapping the Order button
 and moving up or down in the list as desired.
 - When finished, click/tap Save.

Tip: If you use Caterease software and have already established custom quick-pick lists in your Caterease program for fields described here, the fields will automatically transfer into your Placez program as picklist items.
- Click or tap the Settings sidebar option
 .
. - Click/tap Clients >Client Type.
- Click/tap the Edit button
 , located on the upper right-hand side of your screen.
 - Click/tap the Add New button, located on the right-hand side of your screen, just below the trashcan icon.
Result: A field is added to the bottom of the list, titled "New." - Type the name of the picklist item into the "new" Picklist Item field.
- [Optional] Reorder picklist items by clicking/tapping the Order button
 and moving up or down in the list as desired.
 - When finished, click/tap Save.
- Click or tap the Settings sidebar option
 .
. - Click/tap Placez Library and choose Place Type.
- Click/tap the Edit button
 , located on the upper right-hand side of your screen.
 - Click/tap the Add New button, located on the right-hand side of your screen, just below the trashcan icon.
Result: A field is added to the bottom of the list, titled "New." - Type the name of the picklist item into the "new" Picklist Item field.
- [Optional] Reorder your picklist items by clicking/tapping the Order button
 and moving up or down in the list as desired.
 - When finished, click/tap Save.
- Click or tap the Settings sidebar option
 .
. - Choose the category and picklist item you would like to edit (Scenes > Setup Style, Status or Scene Type; Clients > Client Type; Placez Library > Place Type).
- Click/tap the Edit button
 , located on the upper right-hand side of your screen.
 - Click/tap directly into the picklist field you would like to edit.
- Type over the existing picklist item.
- [Optional] Reorder your picklist items in the list by clicking/tapping the Order button
 and moving up or down in the list as desired.
 - When finished editing and/or rearranging the order of your picklist, click/tap Save.
- Click or tap the Settings sidebar option
 .
. - Choose the category and picklist item you would like to delete (Scenes > Setup Style, Status or Scene Type; Clients > Client Type; Placez Library > Place Type).
- Click/tap the Edit button
 , located on the upper right-hand side of your screen.
 - Click/tap the trashcan icon, located to the right of the correspondingPicklist Item field.
- [Optional] Reorder your picklist items in the list by clicking/tapping the Order button
 and moving up or down in the list as desired.
 - When finished deleting and/or rearranging your picklist(s), click/tap Save.